Sunday, July 30, 2017

Laurel Framelits and Lovely Friends


Our July Club enjoyed finding new ways to use Laurel Framelits. Above you will find one of our creations. This card front or embellishment for a scrapbook page; used So Saffron, with Pinewood Plank. This is one of Stampin Up's 3D dynamic textured impression embossing folder. (Hint: Using the Spritzer (126185) lightly spray a mist of water over the cardstock. Then run it through your Big Shot hinged end first.)
Some important information about the Laurel Framelits. First the wreath has a left and right side. It is important that you cut one of each to make a single wreath. However, the banner can be reversed, so you will need to cut 2 of the banner. You will only need one of the center banner. 


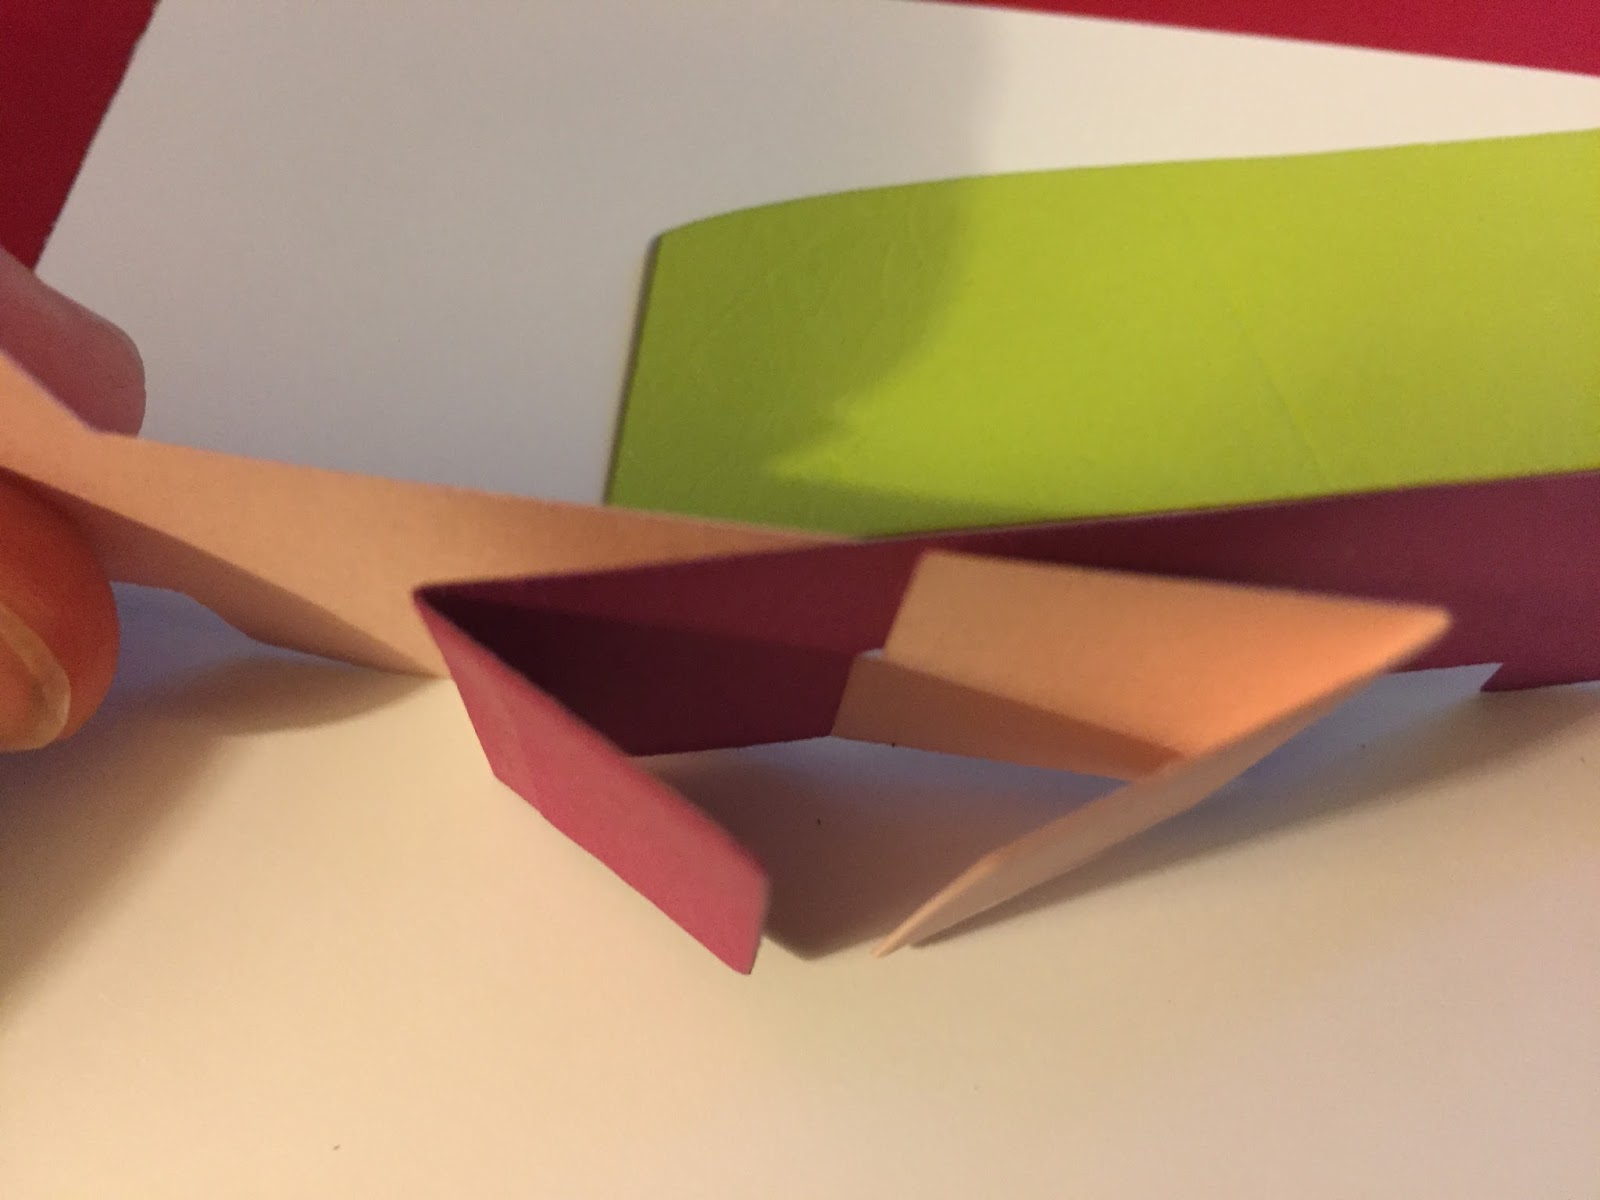
Let's take a look at some pictures to demonstrate the pieces you will need and how they are put together. In this photo notice there is a right and left side. I have made them different colors only to show you how they interlock.
Notice below they are interlock and have some wiggle room to open or close them more. 


When you look at the back you can see how the flaps are folded. For this card; we can just adhere it to the card stock. But for other card you will need to place the edge on the fold of the card. Leaving one side on the right and the second side on the left of the fold.


Now lets look at the banner; as it fold the same way. Again I am using different colored cardstock to show how the pieces fit together. The blushing bride and real red are cut using the same die cut. As stated previously you need 2 of this cut.


To lock them together, you simple flip on piece around 180 degrees. Interlock the at the slits.  When you first slit them together you will see pieces stick up on each side; Now notice how they are folded to the back.


This is the same fold used on the wreath and it is placed on the card fold in the same matter. Placing one half on each side of the cards folder. Then when you open and close the card, your banner will move up and down.

Last place the green piece across the center. Notice there is a score in the middle? This score should be located in the center of the card.

Now lets take a look at some other cards using the same Laurel Framelits:

 Not your average beach card. Just a few fish swimming around...... until you open the inside.
Then the Magic Mermaid and the Laurel Framelites. The wreath section was double to look like sea weed.


Window Shopping sets the stage for this card. This card was made by one of the members in our club, casing the class card. Ooops forgot to put the bow on.... Oh well, you get the picture


It opens up to a wonderful surprise!! This is a great bundle...... one you will not want to miss.

Order Now 
Also remember all orders over $50 qualify for one spot on your Customer Loyality Card. 


Product List
Big Shot
[143263]
$110.00

Monday, July 17, 2017

Adhesive: What to use when?

Customer Loyalty Program Plus 

and

Stampin Up Bonus Days work perfect together!

Making cards and scrapbook pages are more fun when you use the right adhesive. Nothing is more embarrassing than to have your card arrive in pieces; or be showing off your recent scrapbook and the pages fall apart. Stampin Up is taking the guess work out of what adhesive to use and when. In are recent annual catalog you will find the follow chart:
Let's talk about a few important points when using these adhesives. 

Fast Fuse Adhesive

  • Fast Fuse Adhesive is a roll on adhesive. 

  • It works best on card stock and paper, large embellishment, ribbon and 3d objects and accents.   

  • The trick to using fast fuse adhesive is to snap it before picking it up off your paper. A simple flick of the wrist will allow you to pick up you adhesive without spreading adhesive all over your creation. 

  • Refills are available, so there is no reason to purchase the complete case and adhesive. 

  • Fast Fuse Adhesive is a stronger hold than SNAIL adhesive.

SAIL Adhesive 

  • It works best on card stock and paper, large embellishment, ribbon and 3d objects and accents.  

  • Refills are available, so there is no reason to purchase the complete case and adhesive.

    Fine Tip Glue      

    • It works best on small areas and detail die cuts. 

    • Easy to appl

    • Great for glitter also. 

    • Fine Tip Glue dries fast and needs to be stored correctly. The inside of the cap has a pin which needs to be replaced after each use. If the tip should clot, take it apart and clean with warm water. Allow to dry then assemble and close properly. 

    Multipurpose Liquid Glue 

    •  Multipurpose liquid glue is my favorite. It works well on anything except ribbon. 

    • What I like the best is it gives me room to position my project with only a tiny drop. You do not need to use much, a tiny drop is enough. 

    • It dries clear. 

    • A $4 bottles will last a long time; making it inexpensive to use.

    Tear & Tape adhesive


    • Is another favorite; it works well on anything except detail and small places. 

    • Great to use on books and fancy fold cards.

    • This is my go to adhesive for ribbon. Keeps ribbon tight to the page without makes. 

    Stampin Up Dimensionals    

    • Stampin Up dimensional add a nice pop to cards and scrapbook pages. They are just the right size. 

    • Easy to remove the paper off either side. 

    Foam Adhesive Strips

    • Foam adhesive strips are nice to use when making a shaker card. 

    •  Also great to us to add pop to a large area.

    Multipurpose Adhesive Sheets    

    • Multipupose adhesive sheets are the newest addition to Stampin Up collection of adhesives

    • Perfect to use anytime you are going to be placing a detail die cut to any card or pa

    • It comes in a 6x12 sheet, making it easy to cut to match the size of your paper. I do not recommend having any exposed area when you place it in your sandwich for die cutting. 

    • Be sure to peel off the area mark with "peel here" first. This will leave you with a easy sheet to peal off the second part. 

    • Use a bone folder to put large areas down. This is prevent bubbling. 

    I hope this information helps you choice the right adhesive for all your paper crafting projects. Please feel free to comment me with any questions you may have regarding Stampin Up products. 

    Reminder Order from ElainePelletier.StampinUp.net to become apart of our customer loyalty program. 

    Also during the month of July, when you order $50 you will receive a $5 coupon from SU to use on your August order. 


Product List